Wicking-strip prompt: raise the wet boundary inside the paper, above the bath
Separate absorption inside a strip from a reservoir filling up. A dipped paper strip changes locally as its wet region advances upward, while an exposed bath surface remains below that front. The exercise asks for a readable wetting boundary, not a calibrated capillary experiment.
Original on-page illustration; untested generation method. No H3 task has been run for this example and no generated result is shown.
1. Task and background
Separate absorption inside a strip from a reservoir filling up. A dipped paper strip changes locally as its wet region advances upward, while an exposed bath surface remains below that front. The exercise asks for a readable wetting boundary, not a calibrated capillary experiment.
USGS describes water moving through porous spaces and gives a dipped paper towel as an example. NASA’s classroom activity asks learners to observe and measure water travelling up paper strips. These sources support the observation task; they do not test this AI prompt. Here the teaching goal is to keep the internal wet front distinguishable from the exposed bath surface. USGS: capillary action · NASA: water properties, station 2
2. Read the first frame
One vertical pale strip dips into a broad teal bath. Its lower immersed portion is darker; the section above the bath begins dry. Two short dark side ticks mark heights above the liquid. The vessel rim, liquid surface and paper edges are visible on the same fixed view.
Fix the strip outline, vessel and side ticks. Track the wet/dry boundary within the paper separately from the open liquid surface outside it. Wet color should remain bounded by the strip edges; it is not a painted stripe translating upward or an external splash.
Track the first clearly wet region, the advancing transition and the still-dry upper region separately. A slightly irregular front is acceptable if its progression is readable; a perfectly straight edge or constant speed is not required. A small bath-level change is not the same as the whole bath rising to imitate absorption.
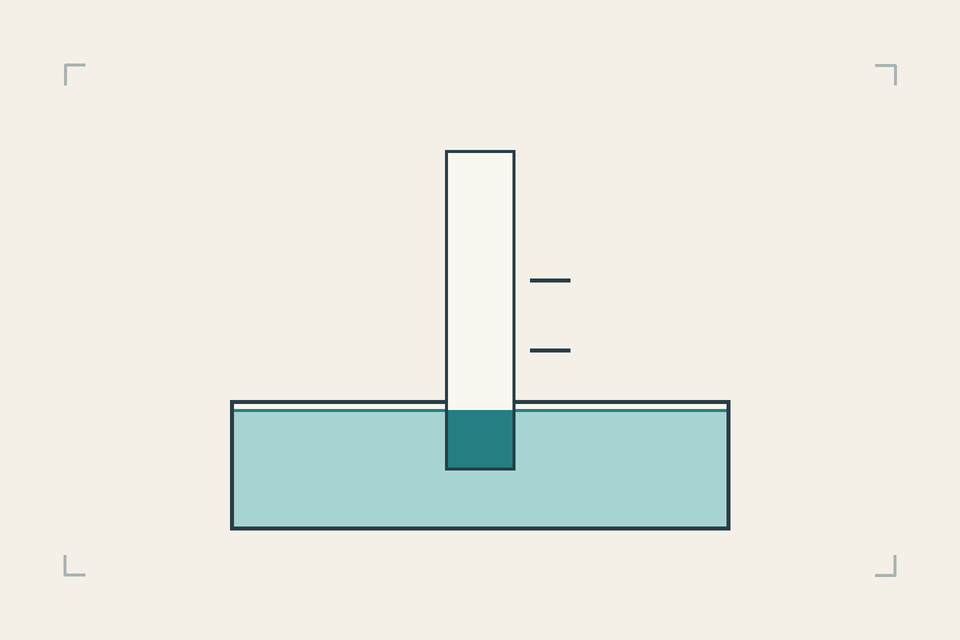 Original illustration: a fixed paper strip dips into a bath with dry paper above the visible surface
Starting layout only. The darker lower patch ends at the bath surface in this image; upward movement above that surface is a requested later action. The two side marks are uncalibrated landmarks. This original illustration is neither a generated result nor evidence of a measured absorption rate.
3. Prepare your own input
Prepare a photograph or drawing that you own or have permission to use. It must show the arrangement in section 2, with the relevant edges, waterline, marks and movement space visible. The on-page illustration explains the example. Adapt object and color names to your own image; if a required relation is hidden, prepare a clearer image before submitting. No example file is needed to read the method or copy its complete prompt.
Open image-to-video and inspect the currently available MiniMax H3 input roles. Use a mode that accepts your authorized image as a single first frame; leave an optional last frame empty. A reference-image role does not automatically constrain the first frame. If the available mode requires two frames, choose a compatible single-first-frame mode before proceeding. Check the current settings and credit estimate before deciding whether to submit. The prompt link prepares text only; it neither uploads an image nor starts a task.
4. Complete prompt and sequence
Start from your prepared, authorized image of a vertical paper strip dipping into a broad liquid bath. Keep the camera, paper outline, vessel and two side ticks fixed. Let a connected darker wet region advance gradually upward inside the same strip from its dipped lower end. Keep the advancing wet-dry transition above the exposed bath surface, with dry paper ahead and darker paper behind. The transition can be slightly irregular; do not turn it into a rigid painted stripe. Keep the change within the paper edges and the exposed bath approximately at its opening level. Do not raise the whole bath to chase the wet front, pour from above, add a brush, slide the paper or tint the scene. End with the lower strip wet and a clearly dry upper portion still visible in the same fixed view. Show a qualitative, time-compressed illustration; do not add a timer, calibrated scale or performance claim.
- Identify the bath surface and the first dark portion of the dipped strip. Leave enough dry strip above for the wet boundary to move without reaching the crop edge.
- Request a modest upward advance within the paper, keeping the exposed bath surface well below that front. Do not introduce a pouring jug, brush or squeeze action.
- Compare the wet front against both fixed ticks and the bath. Inspect still-dry paper ahead of the front as a control; simultaneous tinting of the entire strip does not show progression.
5. Inspect an actual result
Use the criteria below while watching an actual result. In your own notes, record each criterion, its time or frame, the visible observation and your judgment: pass, fail or inconclusive. Leave the observation and judgment empty until you have inspected the output. Mark an obscured contact inconclusive instead of substituting the intended ending for evidence of the transition.
- The paper outline, vessel and height ticks remain fixed.
- The wet region starts from the dipped lower portion.
- A discernible front progresses upward within the strip.
- The front rises above the exposed bath surface rather than following a rising reservoir.
- Dry material remains ahead and no wet color leaks outside the paper edges.
- The ending retains both wet and dry portions without a new liquid source.
6. Repair one failure
- Whole strip darkens at once: shorten the requested advance and preserve dry paper ahead of the front.
- The bath rises instead: name its exposed surface separately and keep the wet front as the only rising boundary.
- The paper slides upward: fix both side edges against the height ticks before judging the color change.
7. Save the result and choose related tasks
Requested ending: The lower strip remains wet, a clearly dry upper portion remains, and the wet front sits above the exposed bath surface in the same fixed view.
After your own generation completes, use the available result-download control to save the generated video. Play the full saved result and keep the actual input, exact prompt, settings and timestamped observations together. A downloaded file is not evidence that the visual checks passed.
These are qualitative visual checks. No material rate, density, displacement, stability or model capability has been measured for this example.
A pour raises a receiving surface; connected vessels redistribute liquid between open surfaces. A rising tide covers low ground with external water, and wave retreat leaves wet sand behind. This shot follows an internal transition through a stationary porous strip while keeping the external bath separate. A tint change without a progressing transition cannot satisfy that task.
- Glass pour: compare flow with the receiving level
- Connected vessels: follow both exposed liquid levels
The illustration and original task prompt were authored for this example. Background sources are linked for the specific claims above; their photographs, videos, diagrams and simulator assets are not supplied as input. Keep a source and permission record for your own image.
Prepare your input
Open image-to-video and inspect the currently available MiniMax H3 input roles. Use a mode that accepts your authorized image as a single first frame; leave an optional last frame empty. A reference-image role does not automatically constrain the first frame. If the available mode requires two frames, choose a compatible single-first-frame mode before proceeding. Check the current settings and credit estimate before deciding whether to submit. The prompt link prepares text only; it neither uploads an image nor starts a task.
- Required: Prepare a photograph or drawing that you own or have permission to use. It must show the arrangement in section 2, with the relevant edges, waterline, marks and movement space visible. The on-page illustration explains the example. Adapt object and color names to your own image; if a required relation is hidden, prepare a clearer image before submitting. No example file is needed to read the method or copy its complete prompt.