The sea and channel remain connected throughout the rise. Water coverage grows through the authored low apron.
Rising tide: follow connected inundation, not ripple texture
Original on-page illustration; untested H3 method. No generated result is shown. The drawing explains an authored arrangement; it is not proof of physics, a qualified generation input or a successful H3 output. Prepare your own authorized image with the required evidence visible.
1. Read the input and set the task
Use this brief when an environmental shot needs a lasting increase in water coverage while the shore and rock stay in place. The useful deliverable is a readable progression of connected coverage, with a stable higher ending. It is not established by changing the surface texture alone.
The input is an invented shore plan seen obliquely. Sea at left connects to a winding channel. A darker low sand apron surrounds it; a pale higher shelf and a marked angular rock sit to the right. The diagram defines relative low and high zones only. It contains no elevation survey and cannot predict any real tide. In the on-page drawing, the blue boundary reaches a small part of the rock outline, but no readable vertical waterline is shown on its face. Use it for the relative plan only. Your own input must separately show a readable initial water contact on a fixed rock face; this drawing alone cannot support the rock-base rise check.
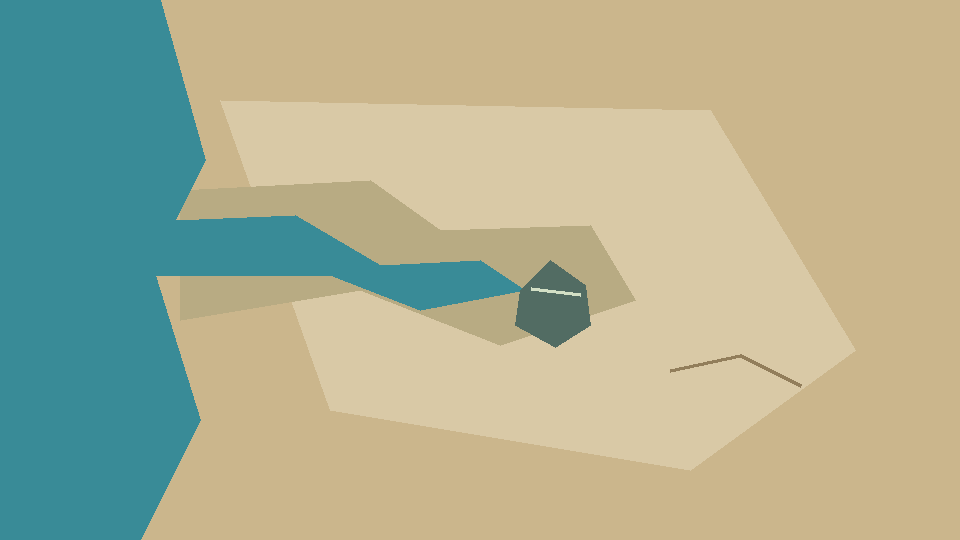 Original authored layout illustration, not H3 output. The sea and channel are shown in plan; the rock face has no readable initial waterline. Sand colors represent authored relative heights, not surveyed terrain. Display only: this picture is not a qualified generation input.
2. Separate the spatial relationships
NOAA describes tides as long-period sea-level changes. This authored scene compresses a modest rise into one shot. Follow the advancing water boundary from the existing sea through the channel; changing highlights alone do not demonstrate that rise. NOAA: what are tides
Connectivity is an explicit condition of this invented input. NOAA’s sea-level viewer distinguishes connected water from low-lying areas whose flooding needs further analysis. It does not validate this drawing or predict the timing of this shot. The source supports keeping connectivity and elevation assumptions visible; it does not establish that isolated pools are impossible in real coasts. NOAA: Sea Level Rise Viewer
NOAA distinguishes vertical tidal change from horizontal current. Track water contact on the fixed rock as well as the shore boundary. NOAA: tides and currents
3. Prepare one manual attempt
Input to prepare: use your own authorized image with the visible objects, counts and spatial references described above. The illustration on this page explains the arrangement. Before running, replace example colors and object names in the prompt with what your image actually contains; keep the relationships and checks that define this task. If a required boundary or target is missing, choose or create a suitable image first rather than asking the model to invent evidence.
Check the input before an attempt:
- The water path from sea to channel and low sand must be visible in the same image. Describe relative low and high regions as authored assumptions; a color patch is not an elevation survey.
- Keep an identifiable upper rock mark, a visible initial water contact and part of the high shelf in frame. If the rock is hidden at the start, choose another image before requesting a rise.
- Record the original contact boundary before the attempt. Keep shoreline geometry and viewpoint fixed; do not compare different crops or treat a moving rock as a water-level gauge.
- Trace the sea-to-channel connection before any generation.
- Mark the low apron, higher shelf and rock outline separately in your notes.
- Request a modest rise that covers part of the low apron but stops below the high shelf.
- Compare successive boundary positions; distinguish increased covered area from movement of the rock or a camera zoom.
Open image-to-video and inspect the currently available MiniMax H3 input roles. Choose a task that accepts one image as the first frame, place your prepared authorized image in that role, and leave an optional last frame empty. A reference-image slot is not automatically a first-frame constraint. If the available mode requires two frames, choose a compatible single-first-frame mode before proceeding; do not invent an ending image. Adapt the complete prompt to your image, then check the accepted input roles, settings and credit estimate before deciding whether to submit. Opening the workspace does not upload or submit a task.
4. Use the complete prompt
Begin from your prepared connected shoreline illustration. Keep the camera, marked rock and all sand geometry fixed. In a clearly time-compressed single shot, let the sea level rise slowly so water spreads from the existing sea through its connected channel and onto the adjoining low sand apron. Cover a little more of the fixed rock base while retaining its angular top and mark. The higher pale shelf stays exposed. Keep the advancing boundary continuous, with only gentle surface movement. Do not create isolated water patches in untouched high sand, move the rock, carve a new channel, create a breaking wave or cut. End at the modest higher level without resetting.
5. Review actual frames with your own notes
Watch the complete untrimmed take at normal speed first, then inspect the relevant frames. For each check, record a timestamp or frame, the visible observation, pass/fail/inconclusive and a reason in your own notes. Compare opening, middle and ending, with extra samples around each change. If occlusion, blur or a cut hides the contact or transition needed for a judgment, mark that relationship inconclusive; do not reconstruct missing evidence from the endpoint. A visible cut separately fails the single-shot requirement. These are authored qualitative checks, not measured model specifications or results.
- The sea and channel remain connected throughout the rise.
- Water coverage grows through the authored low apron.
- The high pale shelf stays exposed at the requested endpoint.
- Rock top and mark stay fixed while its covered base area increases.
- No disconnected blue patch or new channel appears in the original dry high ground.
- The ending retains the higher coverage instead of replaying a ripple cycle.
| Compare | Visible evidence | Fail or uncertain |
|---|---|---|
| Sea, channel and low apron | Successive water coverage grows from the same connected boundary | New isolated blue patches fail this authored input; an obscured channel is uncertain |
| Rock top, mark and base | Top and mark stay fixed while the base becomes more covered | A shrinking or drifting rock cannot establish higher water |
| High shelf and final water edge | The shelf stays exposed; ending coverage remains above the opening | A passing ripple or retreat to the opening boundary misses the requested ending |
| Stage | Expected relationship to inspect | Record from your actual result |
|---|---|---|
| Opening | Original sea–channel connection, rock mark and exposed shelf are readable | Timestamp/frame, visible boundary, and uncertainty |
| Middle | More adjacent low sand is under connected water; the rock mark stays fixed | Compare the same references; identify any jump, obstruction or camera drift |
| Ending | Modestly higher coverage persists; the high shelf still shows | Confirm a continued hold rather than one ripple peak; leave judgment open until viewed |
Counterexample: a dark patch climbs a solid surface while the open water stays unchanged. That could depict wetting, not the requested advancing water coverage. A rock that moves downward also increases apparent immersion. Neither passes the fixed-rock and connected-water checks. Record uncertainty when the contact edge is hidden.
6. Revise one failed relationship
- Only highlights move: ask for changing covered area at the rock base, keeping the surface texture restrained.
- Water appears on the high shelf: reduce the rise and restate the low-zone connection.
- The rock shrinks: lock its top and mark before modifying the water instruction.
7. Keep evidence and understand the limits
Ending state: End at the modest higher level without resetting.
If you later run this task, keep your actual input image, exact prompt, selected settings, full result and timestamped notes together. Make judgments only after viewing that result. The page illustrations are original teaching examples, not H3 outputs or verified physical simulations.
No rate, tidal range, real coastline or flood risk is established. The sequence is fictional and time-compressed; even a visually plausible output would not validate a hydrological model.
After an actual task completes, use its result view to download your own generated output when available, and keep the unedited file with the task identity and notes. That result download is separate from the on-page illustration. A saved file still needs playback and content review before you mark a check as passed.
Background reading; these sources do not test this prompt:
Related tasks:
Prepare your input
Open [image-to-video](/generator/image-to-video) and inspect the currently available MiniMax H3 input roles. Choose a task that accepts one image as the first frame, place your prepared authorized image in that role, and leave an optional last frame empty. A reference-image slot is not automatically a first-frame constraint. If the available mode requires two frames, choose a compatible single-first-frame mode before proceeding; do not invent an ending image. Adapt the complete prompt to your image, then check the accepted input roles, settings and credit estimate before deciding whether to submit. Opening the workspace does not upload or submit a task.
The water path from sea to channel and low sand must be visible in the same image. Describe relative low and high regions as authored assumptions; a color patch is not an elevation survey.
Keep an identifiable upper rock mark, a visible initial water contact and part of the high shelf in frame. If the rock is hidden at the start, choose another image before requesting a rise.
Record the original contact boundary before the attempt. Keep shoreline geometry and viewpoint fixed; do not compare different crops or treat a moving rock as a water-level gauge.
- Required: **Input to prepare:** use your own authorized image with the visible objects, counts and spatial references described above. The illustration on this page explains the arrangement. Before running, replace example colors and object names in the prompt with what your image actually contains; keep the relationships and checks that define this task. If a required boundary or target is missing, choose or create a suitable image first rather than asking the model to invent evidence.