MiniMax H3 knit-unfolding prompt: keep the fabric texture and hand contact readable
A first-frame exercise for one small unfolding action. Separate fabric movement from hand movement, inspect contact points, and use a cut when a large reveal needs another shot.
1. Goal and page examples
Create a quiet close-up in which one folded corner of a knitted textile opens slightly while the other hand steadies the fabric. The exercise tests a visible action and texture continuity, rather than a complete garment reveal.
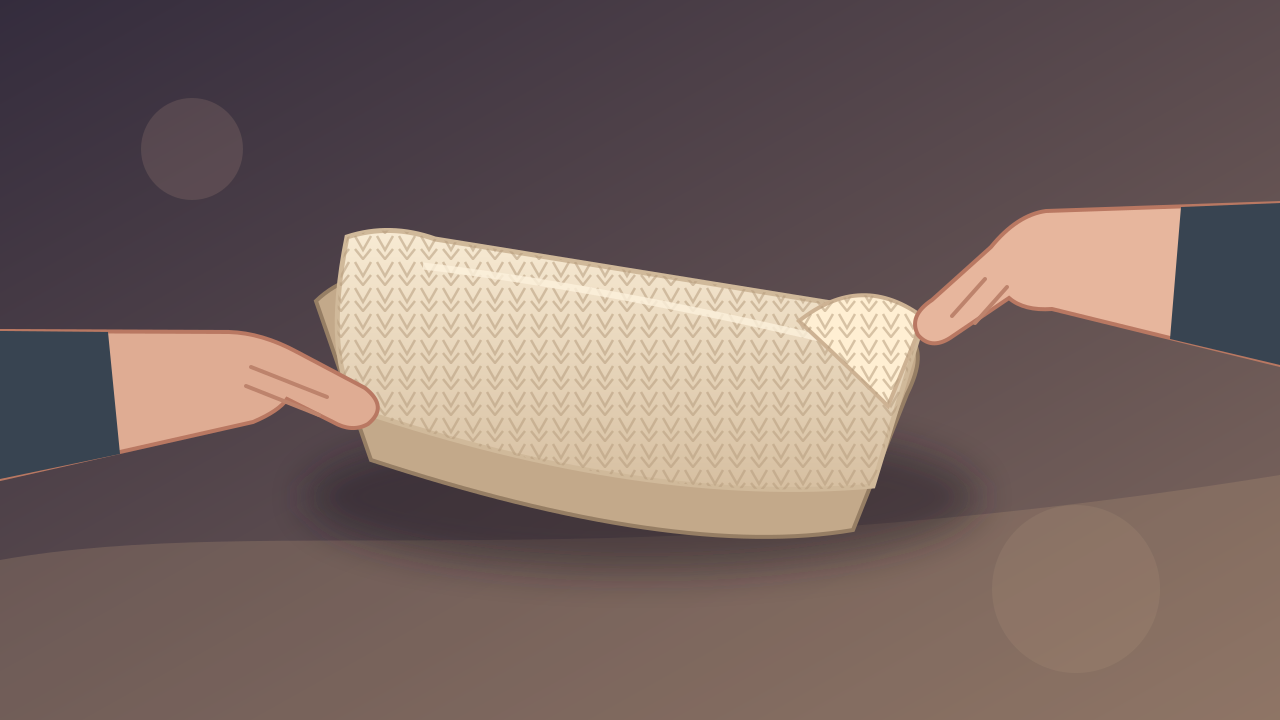
Original authored illustration for reading and comparison; not a generated result.
2. Prepare your own inputs
- Prepare one authorized close-up of folded knit on a table with both hands already touching it. Show a clear lower-fold anchor under the left hand and an upper-right corner held by the right hand, visible knit marks, and room for a small outward pull.
- For a real product, verify that the source actually shows the required folded corner, both contact points and textile surface. The page illustration explains the composition and does not establish product properties.
- Choose one corner and one pulling direction. Leave room around the cloth for that movement; do not ask the same shot to unfold the entire textile, rotate it, and reveal hidden labels.
- Write the visual checks before generating: stable hand count, a persistent contact point, recognizable knit pattern, and no sudden change in cloth width.
- The full prompt below describes the page example. For your own image, match appearance, colors and role names to the actual visible source while retaining the action order and review goal. The example is not automatically supplied to the workspace.
3. Set up a manual task
Open the image-to-video workspace and select MiniMax H3 base mode if available. If First Frame is hidden and the interface offers Add end frame, enable it to reveal the frame roles. Upload only your prepared authorized image to First Frame, leaving the optional Last Frame empty. Copy the full prompt from this page manually and match its appearance details to your image. Inspect current controls and the actual estimate; stop if the mode or first-frame role is unavailable or a second image is required. The link does not upload an image or insert a prompt. Keep annotated review diagrams out of the input slots.
The full prompt below describes the page example. For your own image, match appearance, colors and role names to the actual visible source while retaining the action order and review goal. The example is not automatically supplied to the workspace.
4. Complete prompt
A fixed close-up of a folded cream knitted textile on a warm tabletop, with two stylized hands already touching it. Preserve the illustrated appearance and composition of the input frame. The left hand holds the lower fold still. The right hand gently draws only the upper right corner outward by a small amount, opening one fold. The fabric follows the contact point with a slight soft bend. Keep the visible knit marks recognizable and the textile thickness consistent. Finish with both hands still touching the fabric. Soft steady light, no camera movement, no new objects, no complete garment reveal, no printed text.
5. Inspect the action in order
1. Mark the fixed and moving parts
Before uploading, identify the left-hand contact as the anchor and the upper right fold as the moving part. Keep the camera and background fixed so a change in fabric shape is not confused with a change in framing.
2. Start with a small corner opening
Use your prepared image in image-to-video for one modest unfolding motion. Choose duration and other settings only from the current interface; no fixed provider control range is assumed.
3. Inspect the contact before the texture
Pause the result near the start, midway, and end. First check that the moving hand stays connected to the same corner. Then compare knit marks near the anchored fold, where there should be little movement.
4. Change only the weakest part
If the hand slides through the fabric, reduce the pulling distance and simplify the action wording. If contact is stable but the pattern flickers, reduce fabric deformation. Do not simultaneously add camera motion or a full reveal.
5. Cut to a prepared reveal when necessary
For a large unfolding sequence, use this small action as one shot and prepare a second first frame for the wider reveal. Join the shots after editing; do not rely on one generation to preserve unseen garment construction or exact hand anatomy.
6. Record actual observations
| Check | Actual timecode | Outcome | Notes |
|---|---|---|---|
| The number of visible hands stays consistent with the first frame; no additional hand enters without a planned cut. | |||
| The anchored hand remains near its initial contact point while the moving hand opens the selected corner. | |||
| The visible knit marks change with the cloth movement without abruptly turning into smooth plastic or an unrelated weave. | |||
| The cloth edge remains continuous; no sudden tear, duplicated corner, or unexplained hole appears. | |||
| The final image shows a small opened fold rather than an unrequested full garment or a different object. | |||
| The camera and lighting remain sufficiently stable to compare the cloth before and after the action. |
Use these in-page rows or copy them into your own notes. Enter actual observations only after reviewing a result; use pass, fail or not-observable. Keep the image you actually submitted, complete prompt, selected settings, real task reference and result location with those observations. Hidden or blurred contact remains not-observable.
7. Change one issue at a time
| Issue | One change |
|---|---|
| The hand crosses through the knit or detaches from the corner. | Reduce the opening distance and make the first-frame contact more visible. Retry a single corner action before requesting any larger unfolding. |
| The knit pattern changes style halfway through. | Remove large stretching or twisting instructions. Keep a bigger area of the textile still, and compare that area before changing other settings. |
| Several fingers merge or new fingers appear. | Treat the illustration as a motion-planning exercise. For product delivery, use a clearer authorized input with simpler hand contact, shorten the interaction, or cut before the anatomy error. |
| The model reveals a whole scarf with invented features. | State the limited end state again: one opened fold with no full reveal. Prepare a separate real reveal frame if the finished product needs to be shown. |
8. Keep the ending evidence
Keep the best small action only if it passes the contact and texture checks. A product sequence can continue with a separately prepared reveal shot; the unseen knit structure should come from your source material, not a generated invention.
Related reading
- Glazed pottery: check the highlight and motif during a small camera shift
- Hinged box opening: move the lid, hold the base in place
- MiniMax H3 page-turn prompt: animate blank pages and add exact text in editing
- Reflective bottle light sweep: keep the bottle still, move the highlight
- MiniMax H3 silent unboxing prompt: plan three beats as three simple shots
- Steam above a cup: generate the motion, composite the exact mark